Howto fix a VirtualBox “Failed to access the USB subsystem” error.
The system configuration is:
- Gentoo 10.0 (3.6.6-gentoo, SMP, PREEMPT, x86_64)
- VirtualBox 4.2.4 (app-emulation/virtualbox-bin-4.2.4)
- KDE v4.9.3
The error is not distro or platform specific though.
Now if you encounter the VirtualBox error:
Failed to access the USB subsystem.
Could not load the Host USB Proxy service: VERR_DISK_FULL.
there could be a couple of reasons. But most often they could be:
- Permissions problems for accessing the USB filesystem.
- To check if this is the case try this command as user, and then as root:
VBoxManage list usbhost
If you get the USB devices listed as root but not as user, try to see if the /dev/vboxusb permissions are something like this:
ls -lR /dev/vboxusb/
/dev/vboxusb/:
total 0
drwxr-x— 2 root vboxusers 60 Nov 11 18:07 001
drwxr-x— 2 root vboxusers 40 Nov 11 19:34 003
drwxr-x— 2 root vboxusers 80 Nov 11 18:07 004
drwxr-x— 2 root vboxusers 80 Nov 11 18:07 005
/dev/vboxusb/001:
total 0
crw-rw—- 1 root vboxusers 189, 2 Nov 11 18:07 003
/dev/vboxusb/003:
total 0
/dev/vboxusb/004:
total 0
crw-rw—- 1 root vboxusers 189, 385 Nov 11 18:07 002
crw-rw—- 1 root vboxusers 189, 386 Nov 11 18:07 003
/dev/vboxusb/005:
total 0
crw-rw—- 1 root vboxusers 189, 514 Nov 11 18:07 003
crw-rw—- 1 root vboxusers 189, 515 Nov 11 18:07 004
- Then make sure that you are in the vboxusers group.
- Another reason for such an error is almost not commented on any Google resource for the error. And this reason is the limits of inotify that the system implies.
- Check your limits by:
cat /proc/sys/fs/inotify/max_user_instances /proc/sys/fs/inotify/max_user_watches /proc/sys/fs/inotify/max_queued_events
If you are running at the same time a lot of applications that use inotify (like Amarok, Clementine, Krusader etc.) and meanwhile you start VirtualBox, the probability that the inotify watches per your user to be exhausted is great. And that makes VBox complain and turn off USB support.
- Another way to check the problem, is as user in one terminal to start:
strace -o /tmp/VBoxSVC.out -f /opt/VirtualBox/VBoxSVC
and then again as user in another terminal to start:
VBoxManage list usbhost
Then go back to the first terminal and Ctrl+C the process. Then open the /tmp/VBoxSVC.out and look for permissions problems or “out of space” problems.
So now the fix if the problem is caused by limited inotify handles:
- Create (as root) an /etc/sysctl.d/inotify.conf file with the following contents:
# VirtualBox tweak for USB to work (defaults are 1/2)
fs.inotify.max_user_instances = 256
fs.inotify.max_user_watches = 16384
fs.inotify.max_queued_events = 32768
- Do (as root) a:
/etc/init.d/sysctl restart
and you are ready.
- If for some reason the values above are not enough for you, you may higher them as needed. Look for more info here and here.
Please feel free to comment 🙂
How to turn your TP Link TL-WRT740N router into a fully functional one using OpenWRT
Recently i decided to acquire a full functional wifi router with as much as possible extra features like OpenVPN support, proxy running support etc. So i bought a very cheap and common TP-Link 150Mbps Wireless N Router TL-WR740N.
It comes with many features by default, but not the one I needed, so I flashed it with the OpenWRT firmware images. Here I will describe the whole procedure.
Hardware characteristics:
The one I bought for around $20 turned out to be v4.23. It has a 400Mhz Atheros AR9330 rev 1 CPU, 4MB Flash and 32MB RAM. More info can be found on its product page here.
Installing OpenWRT:
The TL-WR740N v4.23 works perfectly with the current unmodified Attitude Adjustment (12.09-beta) generic WR740N v4 and Attitude Adjustment (12.09 Final) generic WR740N v4 images. The best installation method is flashing it through the stock TP-Link web interface. So first download the openwrt-ar71xx-generic-tl-wr740n-v4-squashfs-factory.bin file from the above links (the 12.09 Final preferred). If there is a newer version of OpenWRT at the time you read this, you may use it, but be sure to download the file ending in: -tl-wr740n-v4-squashfs-factory.bin, or you may effectively brick your router.
Note: Please reset your router to factory defaults if it has been previously configured/used.
- Power up your router device.
- Connect the local PC to any of the LAN ports of the Router.
- Browse to http://192.168.0.1 (alternatively you may use the URL – http://tplinklogin.net).
- Choose the menu “System Tools → Firmware Upgrade”.
- Upload the openwrt-ar71xx-generic-tl-wr740n-v4-squashfs-factory.bin file to router. Be sure to chose a …….-squashfs-factory.bin file!
- Wait for the router to reboot.
- Make sure your router works ok as you unplug the LAN cable from your PC, plug it in back and browse to http://192.168.1.1
The OpenWRT firmware you’ve just flashed is a basic one and is missing the functionality i was talking about (like OpenVPN, proxying etc). So you need to prepare your own firmware and flash it over the generic OpenWRT firmware. Here is how you do it:
You will prepare the firmware image using Attitude Adjustment 12.09-beta ImageBuilder (r33312) or Attitude Adjustment 12.09 Final ImageBuilder. Since TL-WR740N v4.23 doesn’t have any stock USB, any USB stuff should be removed from the default generic OpenWRT firmware image. We will add the following functionality (incl. the web based configuration interface for them – LuCI):
- QOS (incl. LuCI support)
- OpenVPN (incl. LuCI support for Attitude Adjustment 12.09-beta r33312 only, ’cause in the 12.09 Final version it is broken)
- Tinyproxy (incl. LuCI support)
- UPNP (incl. LuCI support)
So, after downloading the Image Builder, extracting it, enter the extraction folder and then continue issuing the respective command:
For Attitude Adjustment 12.09-beta ImageBuilder (r33312):
make image PROFILE=TLWR740 PACKAGES="base-files busybox dnsmasq dropbear firewall hotplug2 iptables iw jshn kernel kmod-ath kmod-ath9k kmod-ath9k-common kmod-cfg80211 kmod-crypto-aes kmod-crypto-arc4 kmod-crypto-core kmod-gpio-button-hotplug kmod-ipt-conntrack kmod-ipt-core kmod-ipt-nat kmod-ipt-nathelper kmod-leds-gpio kmod-ledtrig-default-on kmod-ledtrig-netdev kmod-ledtrig-timer -kmod-ledtrig-usbdev kmod-lib-crc-ccitt kmod-mac80211 kmod-nls-base kmod-ppp kmod-pppoe kmod-pppox -kmod-usb-core -kmod-usb-ohci -kmod-usb2 kmod-wdt-ath79 libblobmsg-json libc libgcc libip4tc libiwinfo libiwinfo-lua libjson liblua libnl-tiny libubox libubus libubus-lua libuci libuci-lua libxtables lua luci luci-app-firewall luci-i18n-english luci-lib-core luci-lib-ipkg luci-lib-lmo luci-lib-nixio luci-lib-sys luci-lib-web luci-mod-admin-core luci-mod-admin-full luci-proto-core luci-proto-ppp luci-sgi-cgi luci-theme-base luci-theme-openwrt mtd netifd opkg ppp ppp-mod-pppoe swconfig uboot-envtools ubus ubusd uci uhttpd wireless-tools wpad-mini luci-app-qos luci-app-openvpn luci-app-tinyproxy luci-app-upnp"
For Attitude Adjustment 12.09 Final ImageBuilder:
make image PROFILE=TLWR740 PACKAGES="base-files busybox dnsmasq dropbear firewall hotplug2 iptables iw jshn kernel kmod-ath kmod-ath9k kmod-ath9k-common kmod-cfg80211 kmod-crypto-aes kmod-crypto-arc4 kmod-crypto-core kmod-gpio-button-hotplug kmod-ipt-conntrack kmod-ipt-core kmod-ipt-nat kmod-ipt-nathelper kmod-leds-gpio kmod-ledtrig-default-on kmod-ledtrig-netdev kmod-ledtrig-timer -kmod-ledtrig-usbdev kmod-lib-crc-ccitt kmod-mac80211 kmod-nls-base kmod-ppp kmod-pppoe kmod-pppox -kmod-usb-core -kmod-usb-ohci -kmod-usb2 kmod-wdt-ath79 libblobmsg-json libc libgcc libip4tc libiwinfo libiwinfo-lua libjson liblua libnl-tiny libubox libubus libubus-lua libuci libuci-lua libxtables lua luci luci-app-firewall luci-i18n-english luci-lib-core luci-lib-ipkg luci-lib-nixio luci-lib-sys luci-lib-web luci-mod-admin-core luci-mod-admin-full luci-proto-core luci-proto-ppp luci-sgi-cgi luci-theme-base luci-theme-openwrt mtd netifd opkg ppp ppp-mod-pppoe swconfig uboot-envtools ubus ubusd uci uhttpd wpad-mini luci-app-qos luci-app-tinyproxy luci-app-upnp openvpn"
The command line we used for the preparation includes all default packages of the default firmware images except: kmod-ledtrig-usbdev, kmod-usb-core, kmod-usb-ohci, kmod-usb2; and adds these packages: luci-app-qos, luci-app-openvpn (for Attitude Adjustment 12.09-beta r33312 only, ’cause in the 12.09 Final version it is broken), luci-app-tinyproxy, luci-app-upnp.
When the process ends, you should have all the needed files in the <extraction folder>/bin/ar71xx/ folder. From there you need only one file – the openwrt-ar71xx-generic-tl-wr740n-v4-squashfs-sysupgrade.bin file. Use this file to upload it to your router and flash it with it using the LuCI interface. So follow these steps:
- Power up your router device.
- Connect the local PC to any of the LAN ports of the Router.
- Browse to http://192.168.1.1 .
- Login LuCI with the default user: root and password: password
- Choose the menu “System → Firmware Flash/Upgrade”.
- Upload the openwrt-ar71xx-generic-tl-wr740n-v4-squashfs-sysupgrade.bin file to router. Be sure to chose a …….-squashfs-sysupgrade.bin file!
- Do not select to keep configuration files and click the Flash button.
- Wait for the router to reboot.
- Make sure your router works ok as you unplug the LAN cable from your PC, plug it in back and browse to http://192.168.1.1
- Telnet to 192.168.1.1 and set a new root password, or browse to http://192.168.1.1 and change the password from within LuCI.
- Proceed with the basic configuration of your router. You may use the relevant documentation on the OpenWRT site.
That is all. Now you have achieved the targeted extra features for your TP Link TL-WR740N v4.23
Note: If you are not comfortable with building your own modified image in the Image Builder, you may use the images I have prepared and tested. You can download them from here. Please use only the openwrt-ar71xx-generic-tl-wr740n-v4-squashfs-sysupgrade.bin (12.09-beta) or the openwrt-ar71xx-generic-tl-wr740n-v4-squashfs-sysupgrade.bin (12.09 Final) firmware images from there! The -factory.bin ones have not been tested, so you may effectively brick your router!
Serial cable for the TL-WR740N
If for some reason you brick your router and the failsafe mode of the OpenWRT firmware doesn’t work, you will need to debrick your router using a serial cable. Here is how you do it:
The v4.23 of the router uses the standard TP-Link pin-out, however the TX pin is not connected to the CPU. In order to make the TX line working, the two points on the bottom side of the PCB must be connected with a small wire. The pin at the SOC is labeled TP18, the one at the serial connector is labeled TP28. The RX line is 5V intolerant! So the connection needs a 3.3V RS232 level shifter. Pins on the connector of the board (look at the photos at the bottom of this post) are TX-RX-GND-3V3(VCC) (from left to right). After you solder all connections, you may use an USB to UART TTL convertor that you plug into your PC and use for example the cutecom application to connect to the /dev/ttyUSB0 device on your PC. Do not forget that you need to connect the TX pin of the convertor to the RX pin of the board and the RX pin of the convertor to the TX pin of the board. In case you use the USB to UART TTL convertor, you do not need to connect the VCC pin. Another important thing to do is to set the convertor to work with 3.3V if it can work both with 5V and 3.3V ! For more info look at the images at the bottom of this post.
After you are ready with your serial cable, you may proceed with the following steps:
- Put the original openwrt-ar71xx-generic-tl-wr740n-v4-squashfs-sysupgrade.bin (12.09-beta) or openwrt-ar71xx-generic-tl-wr740n-v4-squashfs-sysupgrade.bin (12.09 Final) to your TFTP server.
- Hook your router’s WAN Ethernet port up to your network/PC.
- Hook up the serial cable/console as explained in the section “Serial cable for the TL-WR740N“, start your cutecom application, open the /dev/ttyUSB0 device, fire up your router and send a “tpl” command when your router shows “Autobooting in 1 seconds” to get console access.
- Now we need to set router and server IP addresses (here named ROUTERIP and SERVERIP, substitute these with the real IP addresses). You’d better use these as IP’s: ROUTERIP->192.168.1.111 and SERVERIP->192.168.1.100. Type in the console (substitute as needed):
setenv ipaddr ROUTERIP

setenv serverip SERVERIP

printenv - Double check that the output of printenvlists the IP addresses you just set. Now we can load the firmware over TFTP with “tftpboot 0x80000000 openwrt-ar71xx-generic-tl-wr740n-v4-squashfs-factory.bin”:
ar7240> tftpboot 0x80000000 openwrt-ar71xx-generic-tl-wr740n-v4-squashfs-factory.bin Using eth0 device TFTP from server 192.168.1.100; our IP address is 192.168.1.111 Filename 'openwrt-ar71xx-generic-tl-wr740n-v4-squashfs-factory.bin'. Load address: 0x80000000 Loading: ################################################################# ################################################################# ################################################################# ################################################################# ################################################################# ################################################################# ################################################################# ################################################################# ################################################################# ################################################################# ################################################################# ###################################################### done Bytes transferred = 3932160 (3c0000 hex) - Note the “3c0000” in the last line (your number may differ). Now execute the following commands, if necessary replacing 3c0000with the number you got from tftpboot:
erase 0x9f020000 +0x3c0000

cp.b 0x80000000 0x9f020000 0x3c0000

bootm 0x9f020000 - You’re set, OpenWrt should now boot and you can set it up as usual.
More resources on OpenWRT and TL-WR740N
If you need more info about all these, it is best to look at the official OpenWRT pages.
There is a specialized page about TL-WR740N there, so you can start with it first.
Final Notes
I have tested my TL-WR704N v4.23 router with Gargoyle and DD-WRT too, but I am not satisfied with the results at all.
- Gargoyle versions were 1.5.7 and 1.5.10, but they were almost twice slower than the OpenWRT version. The interface is really quite clean and is closer to a stock one, thus being suitable for novice Linux users that do not have that much knowledge about *nix as a whole. And though Gargoyle has some additional nice features, they do not really worth it. You should also have in mind that it has no OpenVPN support in the firmware for this specific model.
- DD-WRT was a testing version 10-12-12-r20119-testing, and it was supposed to work ok, but actually it bricked my router, so I needed to go to the serial console to fix it. In a word, i would not advice you to test DD-WRT at all, if you are not prepared for de-bricking 🙂
Photos of TL-WR740N
-

- TL-WR740N v4.23 case front
-

- TL-WR740N v4.23 case back when opening
-

- TL-WR740N v4.23 case back
-

- TL-WR740N v4.23 board front
-
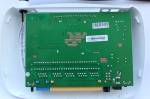
- TL-WR740N v4.23 board back
-
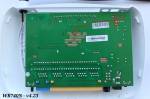
- TL-WR740N v4.23 board back with pin layout
-

- TL-WR740N v4.23 board back with serial cable soldered
-

- TL-WR740N v4.23 with a serial cable in the case
-

- USB to UART TTL gadget
Finally I was banned !!! :D
Words fail me to describe you how glad and happy I am that finally, for the first time in my life I was banned from a tech forum… 🙂
After almost 15 years on the Net, with hundreds of bug reports, bug fixes, community contributions and community members help behind my back and no actual problems with any of the numerous *nix communities out there…. the miracle happened … I was banned by someone from the PCLinuxOS forums 🙂
Here is the explanation:
Sorry Guest, you are banned from using this forum!

Rudeness on forum -- inappropriate posting
I really should thank those guys ’cause up till now i have not experienced the feelings of being banned 🙂 And that adds a valuable experience to my life 🙂 Thanks guys… Really….
Now beside these facts, I cannot restrain from writing some comments on this anyway…
It all started with a simple and very innocent bug report about a misbehaving gdb and cmake packages… It was properly written and having some suggestions for fixing them… This was followed by comments of two members on how i am wrong and how i should read the docs of the distro… That was a good suggestion if those docs were easily accessible 🙂
Anyway i tried to explain again the issue and i used a link to my PlexyDesk RPM spec file just as reference. Of course i was angry that the people answering did not at all read carefully what i have explained… Then i was accused of a bad attitude, rudeness etc etc sins…
Yeah i may have a different attitude but who has not? Do they expected me kissing their as*es and begging them? Nah.. they cannot be so blindfolded…
Anyway someone with a nickname Neal (and thousands of posts) decided to do an “analysis” of my spec, though no one asked him for that… Nothing wrong with that since i am very opened to constructive critics… Anyway when we cut out the obvious superficial read of the specs by Neal.. and his obvious nagging notes on “problems” with the spec…. The only actual problem was that in the comments inside the spec file i had a typo PCLinux and not PCLinuxOS :D… That is great isn’t it…
Next some member started to explain me how i cannot enter any house (implying theirs) and start rearranging without any permission :D…. LOL… this is what i call relevance :)… This person obviously forgets that “their house” is actually a COMMUNITY HOUSE with a lot of members…. but i guess that is part of this distro’s fanbois attitude…
Anyway all this only shows how things even in the *nix world can be mangled to a state that has nothing to do with the original ideas about freedom and stuff…
So here is what i want to tell those guys… I do not plan wasting my time emailing them or anything like that… so i post here in order other users to be able to read it and draw their conclusions for themselves…
1. Banning someone from a tech support forum for whatever reason(except spamming of course) is not right. It is not right because it shows weakness in the first place. It shows that one cannot handle other people’s opinion or suggestions… that one has problems with himself :)… It shows narrow mind also… And not to mention the total uselessness of this action… Do you guys think i cannot come back with another fresh email account and through the million proxies that Tor or any other anon service offers? What about my dynamic IP that my ISP has? 🙂 Hmm nah.. this is stupid and immature…
2. Banning someone is not like turning the light off 😛 You cannot pretend your problems are non existent… I already told you about the ostrich that pushes its head into the sand and thinks its perfectly safe… but we all know where its bottom is :D… You cannot run away your distro’s problems by banning… on the contrary… you can just help your distro to fade out eventually… ’cause even fanbois have versatile interests 🙂 especially when something starts to behave abnormally…
3. God does not speak through you, neighter the world starts and ends with you….(Same goes for anyone else incl. me)… And… Welcome to the real world and get real… get a life… Anyway…
….. I could write a lot more… but i do not see any use in that…
So a couple of notes on the distro….:
1. Total Mandriva clone… They claim it is not like Mandriva… but actually they use almost every good code of it… the problem is that they do amend it inappropriately and this creates problems… not for the ordinary user of course…
2. Nothing special about this distro… It offers KDE and xfce as a whole… i.e. something you can get from all other distros out there..
3. The distro configuration manager is totally one to one with the Mandriva Config centre
4. The packaging system is so much amended that it gives quite a heck for an outside dev to be sure his spec will work as expected on the next distro’s version… i.e. very inconvenient for developers…
5. Very low popularity of the distro meaning bad support and a lot of problems… You may find this post useful too, though it is outdated, but almost everything in it counts nowadays too…
6. Creepy attitude by the developers and by most of the community members…
7. Since i tested it on a real PC i do not find any difference in speed or whatever compared to the other more popular distros like Gentoo, Mandriva, Ubuntu etc… There are plenty of reviews on the net about this… Here is one.. and if you read its comments you will get much better picture of its community attitude 🙂
So because all of these I dropped building/testing support of PlexyDesk for this distro…
Not that it will be of any lost to us or to them… but I really do not intend to waste my time doing any fanbois’ job 🙂
There is more tech info here.
Feel free to comment 🙂
Ubuntu Linux and the ACS ACR38DT DualKey smart card reader
Recently I bought the ACS ACR38DT DualKey smart card reader (ID 072f:90cc Advanced Card Systems, Ltd ACR38 SmartCard Reader).
Since I work only on a Linux box, I needed a support driver for this device.
The PC/SC light project offers a CCID common driver that works with this device – the libccid package on Ubuntu.
But my problem was that I also have a OMNIKEY CardMan 6121 smart card reader that refuses to work properly with the PC/SC CCID driver, so i needed the official driver supplied by HID Global (see the Download link on the product page). Ubuntu offers an official driver for CardMan 6121 – pcsc-omnikey package. Unfortunately this package conflicts with the libccid package and the last cannot be installed together with the pcsc-omnikey. Another problem of the CardMan 6121 is that the pcsc-omnikey package is outdated, so i needed to download and prepare a new package for Ubuntu with the updated official driver version. It is now in my Ubuntu PPA repository for all those that will need it.
So in order to use my ACS ACR38DT DualKey smart card reader with the native PC/SC CCID driver i needed to remove the pcsc-omnikey package… I.e. I had to chose between using one of my readers at a time… A situation that was unacceptable for me…
I solved this problem by downloading the Linux driver from Advanced Card Systems and preparing a new CCID ACR package. BTW Ubuntu has a non-CCID driver package in the repositories and it’s named libacr38u. Sadly it does not support the listed smart card reader above.
So the new prepared package named: pcsc-acsccid, is ready and in my PPA repository. The difference from PC/SC native CCID driver is that it is standalone and does not need any additional packages except the official pcscd package from Ubuntu’s repos…
It works ok and that solved my two card readers problem…
So now I can use both my smart card reader devices (the OMNIKEY CardMan 6121 and the ACS ACR38DT DualKey) at the same time. 🙂
If you have the same problem I hope my solution helps you.
About Amarok and KDE4…
(posted on http://amarok.kde.org/en/releases/2.0 )
It is a pity that Amarok from the best Linux music player (v1.x) turns into one of the many music players out there for Linux…
But I understand it is not entirely by your fault… It was inevitable when you follow the KDE development and since the crap named KDE4 all this is going totally messed up and wrong, and finally will end up in oblivion.
What i do not understand is why should one start something almost from scratch in order to make some “nice” looking GUI and buggy not fully functional code, as he still has not fixed all the bugs and functionality in the old working version (this counts both for Amarok and KDE4). Is the reason for this to show the world that one may code or that one is a great developer? And where are the users’ opinion and ideas? You always say this or that new feature is better and usability is much better… OK, all this is better, but to whom it is better? To your users or to you the developers?
Because once you used to listen to your users… I still remember a version of Amarok that suddenly changed the GUI and because the users were totally disappointed, this version didn’t make it at all. What is now going on…. You find every reason to say how great you cope with the “new” development…. but we all know that there will be at least an year time to fix all bugs and introduce all old features to this new code…. Who do you lie infact …?
According to me one should do big steps when he is ready for that, and he should do it in small stages…. And you are not ready, neighter KDE is ready…
Sorry if my opinion sounds to you too rude or inappropriate but I am really disappointed by Amarok2 and KDE4 as a whole… which makes me switch to GNOME (no matter how much i do not like it)…
HOWTO easy compile SubDownloader on Windows for free
I hope this post will help all the Windows users of SubDownloader that are dissatisfied with the new silly and insipid “Dual-Licensing” policy of the application concerning Windows OS binaries.
I wrote this HOWTO for the users that want to have SubDownloader packed and independent of any Python on the machine… like in situations when you put it on another MS computer, or you uninstall the Python and it’s modules etc.
The steps to follow for the building of SubDownloader on Windows are:
1. Depending on your Windows version, install
Microsoft Visual C++ 2005 Redistributable Package (x86) from here
or
Microsoft Visual C++ 2008 Redistributable Package (x86) from here.
2. Download and install the Windows 2.6.(x) version of Python from here:
http://www.python.org/ftp/python/2.6.1/python-2.6.1.msi
As an install folder use something simple (for convenience) like:
C:\python26
3. Download and install the PyQt4 for Windows (it should match the Python version you have downloaded in step 1 i.e. PyQt-Py2.6-gpl…) from here:
http://www.riverbankcomputing.co.uk/static/Downloads/PyQt4/PyQt-Py2.6-gpl-4.4.4-2.exe
4. Download and install the py2exe binary (it should match the Python version you have downloaded in step 1 i.e. …win32-py2.6.exe ) from here:
http://downloads.sourceforge.net/py2exe/py2exe-0.6.9.win32-py2.6.exe?modtime=1226789831&big_mirror=0
5. Download the latest sources of SubDownloader from here:
http://code.launchpad.net/subdownloader/trunk/2.0.9/+download/SubDownloader-2.0.9.tar.gz
6. Create the folder “PROJECTS” in the install folder of Python from step 1 (C:\python26\PROJECTS)
7. Extract the SubDownloader-2.0.9.tar.gz into C:\python26\PROJECTS.
You may use any archive program for that like IZArc (it is a very good and free application).
After the extraction of the archive you should have this directory containing all the files of SubDownloader:
C:\python26\PROJECTS\subdownloader
8. Download and put in the C:\python26\PROJECTS\subdownloader folder these two files:
9. Download and install the NSIS (Nullsoft Scriptable Install System) from here:
http://downloads.sourceforge.net/nsis/nsis-2.42-setup.exe?modtime=1229784695&big_mirror=0
10. Open Windows command shell (Command Prompt) window and issue these commands in it (copy/paste them one line at a time):
| Code: |
| cd C:\python26\PROJECTS\subdownloader ..\..\python -OO setup.py py2exe |
11. You are ready with the build. The result is in the “dist” directory – C:\python26\PROJECTS\subdownloader\dist.
Test if the build works by starting the C:\python26\PROJECTS\subdownloader\dist\SubDownloader.exe file.
If it works you may proceed to next step and use the “dist” folder without making an install package
OR
you may go directly to step 14 to prepare the install package of SubDownloader.
12. Uninstall any previous versions of SubDownloader, copy the “dist” directory to your “Program Files” folder, rename it to: “SubDownloader” and create a shortcut to the “SubDownloader.exe” file.
13. Start the SubDownloader.exe and you will have a working, no time limit and open source, free application for Windows.
Below are the steps to prepare an install package of the already built SubDownloader.exe.
14. Open Windows command shell (Command Prompt) window and issue these commands in it (copy/paste them one line at a time):
| Code: |
| cd C:\python26\PROJECTS\subdownloader “C:\Program Files\NSIS\makensis.exe” installer.nsi |
15. You are ready with the install package. You may find it in the C:\python26\PROJECTS\subdownloader folder as:
C:\python26\PROJECTS\subdownloader\SubDownloader_2.0.9-Installer.exe.
Now you have a python independent and free SubDownloader Windows installer that will uninstall the shareware version you have and install the free version.
If you have any questions i will be glad to help you.
NOTE: In case the above steps produce errors on your OS or something is not working, please try to use the Python 2.5.2 version and all the other versions of the programs listed above for that python version. Links are as follow:
1. Python – http://www.python.org/ftp/python/2.5.2/python-2.5.2.msi
2. PyQt4 – http://www.riverbankcomputing.co.uk/static/Downloads/PyQt4/PyQt-Py2.5-gpl-4.4.3-1.exe
3. py2exe – http://downloads.sourceforge.net/py2exe/py2exe-0.6.9.win32-py2.5.exe?use_mirror=kent
Your feedback on this is very welcome because probably some tweaking of this HOWTO is needed for the different Windows versions, but for this to happen you should share your experience in the building and packaging. To do this please answer the following questions no matter if building works or not:
1. What version of Windows you are using (98, XP, Vista)?
2. What version of Python/PyQt4/py2exe did you use?
3. Did you need to install some additional stuff from MS like Microsoft Visual C++ 2005 Redistributable Package (x86) etc.?
4. Did you need to do anything else not described in the HOWTO to make all work?
Thanks in advance…
For getting more info read the following thread here.
WARNING: Distributing the installer or the binaries that you get from this HOWTO breaks the EULAs with Microsoft and this makes their distribution ILLEGAL. BTW the same issue is with the official SubDownloader installer/binaries… ![]()
About me

I am a nice and loving person when you get to know me 😉
Ask me for more… 😛
To err is human, to forgive divine
Alexander Pope
If you love someone, set him free.
If he comes back he’s yours;
If he doesn’t he never was.
Richard Bach
____________________________
Recent Comments
CESAR SALAZAR on How to turn your TP Link TL-WR… sgoloj09 on How to turn your TP Link TL-WR… Collis Williams on Howto fix a VirtualBox “… Sina on How to turn your TP Link TL-WR… Sina on How to turn your TP Link TL-WR… Flickr Photos


")


